Friday, December 19, 2008

Working with Adobe Premiere Pro's Basic 3D Video Effect PART 5

In the last part of this tutorial, we are going to add the spotlight effect that you may have noticed in the preview video from the first part of this exercise. Let's take another look. As the text tilts and swivels, you should see a glare that moves on its surface:


Let's now learn how to add that effect.

Make sure that the "Basic 3D" title clip on the Timeline is still selected. Then in the Effect Controls window, make sure that the Show Specular Highlight property of the Basic 3D video effect is checked. This will add that spotlight effect you saw in the preview above.


To be able to preview the Specular Highlight, you will need to render your sequence. Choose Sequence > Render Work Area from the main menu in order to render a preview.


Then just wait for Premiere to finish rendering.


Once rendering is finished, you should be able to view your sequence in the Program view of the Monitor window and see the specular highlight applied.

And that concludes this tutorial on Working with Adobe Premiere Pro's Basic 3D Video Effect.

go back to Working with Adobe Premiere Pro's Basic 3D Video Effect PART 4

Saturday, December 13, 2008

Working with Adobe Premiere Pro's Basic 3D Video Effect PART 4

We will now be working with the Distance to Image property of the Basic 3D video effect. The higher the value that you assign to this property, the further away the image will appear.

Make sure that the clip on the Timeline is still selected. And in the Effect Controls window, bring the playhead back to the leftmost edge of the clip's timeline. Then, click on the Toggle Animation button beside the phrase Distance to Image in order to enable keyframing for this property. Keep the Distance to Image value at zero.


Next, move the playhead forward. Position it somewhere within the middle of the clip's timeline and add another keyframe to the Distance to Image property. On this keyframe, change the Distance to Image value to 100.


Let's add one last keyframe for the Distance to Image property. Position the playhead on the rightmost edge of the clip's timeline and add a keyframe there. On this keyframe, change the Distance to Image value back to zero.


By now, when you play your sequence on the program monitor, you should have something like this:


go back to Working with Adobe Premiere Pro's Basic 3D Video Effect Part 3
continue to Working with Adobe Premiere Pro's Basic 3D Video Effect Part 5

Working with Adobe Premiere Pro's Basic 3D Video Effect PART 3

We will now be working with the Tilt property of the Basic 3D video effect. The Tilt property controls the clip's vertical rotation.

Make sure that the clip on the Timeline is still selected. Then go the the Effect Controls window and position the playhead on the same point as the third keyframe of the Swivel property. Then click on the Toggle Animation button beside the word Tilt to turn on keyframing for the Tilt property. Leave the Tilt values on this keyframe at 0 x 0.0.


Then move the playhead forward by about 1 second and add another keyframe. On this keyframe, change the angle value to 70.


Move the playhead forward again by about 1 second and add another keyframe. Let's make the text rotate vertically towards the opposite direction. In the previous keyframe, the angle was set to 70 degrees. If we input a lower value on this next keyframe, the clip will rotate towards the opposite direction. We can even input a negative value. So let's go ahead and do that. On this new keyframe, change the angle to -70. This will result in the text rotating in the opposite direction starting from the previous keyframe.


Let's add one last keyframe for the Tilt property. Position the playhead on the rightmost edge of the clip's timeline and add a keyframe. On this keyframe, change the tilt angle value back to zero.


At this point, when you watch your sequence on the program monitor, you should have something like this:


go back to Working with Adobe Premiere Pro's Basic 3D Video Effect PART 2
continue to Working with Adobe Premiere Pro's Basic 3D Video Effect PART 4

Friday, December 12, 2008

Working with Adobe Premiere Pro's Basic 3D Video Effect PART 2

Next, we are going to apply the Basic 3D video effect to the title clip that was just placed on the Timeline.

Go to the Effects window (choose Window > Effects from the main menu if you do not see it). You will find the Basic 3D video effect under Video Effects > Perspective. Once you find it, click and drag it down onto the basic_3D title clip on the Video 1 track of your Timeline in order to apply the video effect.


Make sure that your title clip is still selected, then go to the Effect Controls window (choose Window > Effect Controls if you do not see it). You should be able to see Basic 3D under Video Effects. Click the right-facing arrowhead beside the word Basic 3D in order to see the effect's properties. You will see 5 items: Swivel, Tilt, Distance to Image, Specular Highlight and Preview.


Let's work with the Swivel property first. The Swivel property controls the clips horizontal rotation. It has two values that you can work with: the number of rotations and the rotation angle.

Make sure that the title clip on your Timeline is still selected. Then in the Effect Controls window, drag the playhead to the leftmost edge of the clip's timeline. Then click on the Toggle Animation button beside the word Swivel (it's the icon that looks like a stopwatch). This will turn on keyframing for the Swivel property and will automatically add one keyframe to where the playhead is positioned.


Then move the playhead forward by about 1 second and add another keyframe by clicking on the Add Keyframe button. Keep the playhead over that keyframe and change the Swivel property's angle value. The angle value is the one to the right of the x. Right now, it should be 0.0. Click on it and input a value of 80.


Then move the playhead forward once again by about 1 second and add another keyframe. On this keyframe, change the Swivel property's angle back to zero.


By now, if you play your movie on the program monitor, you should have something like this:


go back to Working with Adobe Premiere Pro's Basic 3D Video Effect PART 1
continue to Working with Adobe Premiere Pro's Basic 3D Video Effect PART 3

Working with Adobe Premiere Pro's Basic 3D Video Effect PART 1

Level: Basic
Software: Adobe Premiere Pro
Version: 1.5

In this tutorial we will learn how to use Adobe Premiere Pro's Basic 3D video effect. Here's a sample video file that shows what we hope to achieve by the end of this exercise:


Let's begin by creating a folder named Basic_3D_Effect. You may place this folder anywhere on your hard drive.

Next, create a new Adobe Premiere Pro 1.5 project. Select the DV-NTSC Standard 32kHz Preset. Name your project Basic_3D_Effect and save it inside the Basic_3D_Effect folder you just created. Click on OK.


Next, create a new Title by choosing File > New > Title...

Using the Title designer's Type Tool, type in the words "Basic 3D". Type the word "Basic" on one line and type "3D" on the next line similar to the image below.


Use a big bold font and choose a color that isn't too bright. To change the color of your text, select it first, then go to the Object Style section of the Adobe Title Designer. Under the Fill properties, click on the color box to the right of the word Color. This will bring up the Color Picker window where you will be able to choose your desired color.


Save your Title file as basic_3D.prtl (make sure you save it in the Basic_3D_Effect folder as well) and close the Title Designer window.

From the Project window, drag the basic_3D title down to the video 1 track of your Timeline. You can zoom in on your Timeline in order to see the clip better. Make sure that the clip is about 5 seconds in duration.


continue to Working with Adobe Premiere Pro's Basic 3D Video Effect PART 2

Wednesday, December 10, 2008

Motion Effects: Keyframing the Rotation Property PART 3

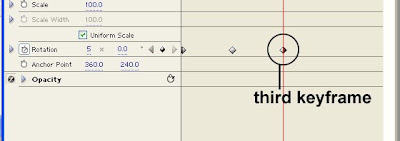
Next, we will add a third keyframe.

Starting from the second keyframe, we will set it so that the "rotate me" text will rotate three more times until it reaches the third keyframe. You will probably assume that you just need to input a value of 3x0.0 for the third keyframe. But that would be an incorrect assumption. Read on to find out why.

Make sure that the title clip on the Timeline is still selected and add another keyframe after the second keyframe. Position this third keyframe about 5 seconds away from the second keyframe. On this third keyframe, set the rotation value to 5x0.0. This will make the "rotate me" text rotate 3 more times starting from the second keyframe.


Now why does it rotate 3 times when a value of 5 was specified?
Remember that in the second keyframe, the rotation value is 2x0.0. To make the clip rotate 3 more times from that point until it reaches the third keyframe, we need to ADD a value of 3 to the previous value (which is 2). This is why we specified a value of 5x0.0 instead of just 3.

Next, we are going to add a fourth keyframe. From keyframe no. 3 to keyframe no. 4, we are going to set it so that the "rotate me" text rotates toward the OPPOSITE direction (so far the text has been rotating in a clockwise manner, so for this fourth keyframe, we will make the text rotate in a counterclockwise manner).

Make sure the title clip on the Timeline is still selected. Then in the Effect Controls Panel, add another keyframe about 5 seconds away from the third keyframe.

In order to make the clip rotate counterclockwise, we will need to specify a rotation value that is LOWER than the one in the previous keyframe. The rotation value in keyframe no. 3 is 5x0.0. So if you specify a lower value of 4x0.0 for keyframe no. 4, that would be a difference of 1. So that's going to make the clip do 1 full counterclockwise rotation. If you specify a value of 3x0.0, then that would make a difference of 2, so it's going to make 2 full counterclockwise rotations instead. For this specific keyframe, let's specify a value of 4x90.0. This will still have the effect of making the clip rotate counter-clockwise. However, instead of settling at an angle of 0.0 degrees, it's going to stop once it reaches 90.0 degrees. So it's actually not going to make a complete counterclockwise rotation all the way down to 0.0 degrees. Instead, once it reaches 90.0 degrees, it's going to stop.

Here's a summary of the values:
Keyframe no. 1 - 0.0
Keyframe no. 2 - 2x0.0
Keyframe no. 3 - 5x0.0
Keyframe no. 4 - 4x90.0

By now you should have something similar to the sample video shown at the beginning of this tutorial. Check to see if that is the case, and then experiment further using different values to test your understanding of the topic.

And that concludes this basic tutorial on keyframing a clip's rotation property.

go back to Motion Effects: Keyframing the Rotation Property PART 2

Motion Effects: Keyframing the Rotation Property PART 2

Make sure that the title clip on the Timeline is selected then go to the Effect Controls Panel. If you do not see the Effect Controls Panel, choose Window > Effect Controls from the main menu.

Expand the Motion Category by clicking on the right-pointing arrowhead beside the word Motion. Once expanded, you should see all the Fixed Motion Effects (Position, Scale, Rotation and Anchor Point). Make sure that you can see the clip's Timeline View as well. If you do not see it, click on the Show/Hide Timeline View Button.

Note: If you are unable to click the Show/Hide Timeline View Button, you may need to extend the Effect Controls Panel's size. If it's docked inside the Monitor Window, try increasing the Monitor Window's length so that the length of the Effect Controls panel will increase accordingly as well. Or you can remove the Effect Controls Panel from the Monitor Window by clicking and dragging it out of the Monitor Window. Once it's out of the Monitor Window, increase the Effect Controls Panel's length and click on the Show/Hide Timeline View Button to reveal the selected clip's timeline.

Also, make sure that the Effect Controls Panel's zoom slider is slid all the way to the left. That way, you'll see the entire length of the selected clip in the Timeline View.

Let's now add the first keyframe. In the Effect Controls Panel's Timeline View, make sure that the playhead is at the leftmost edge. Then click on the Toggle Animation button beside the word Rotation. Activating the animation button will result in the first keyframe being automatically added. Keep the rotation value as it is (0.0). This means that you are starting at a 0.0 degree angle.

Next, while still in the Effect Controls Panel's Timeline View, move the playhead forward to about 5 seconds. It doesn't have to be exact. Then click on the Add/Remove Keyframe button to add another keyframe. On this keyframe, type in a rotation value of 2x0.0. Then hit enter to apply the value.

Move the playhead back to the beginning of the Timeline and click on the Program Monitor's Play button in order to preview your work. You should see the title clip make 2 full rotations.


In the first keyframe, the rotation value is set to 0.0 degrees. In the second keyframe, the rotation value is set to 2x0.0. This means that starting from the first keyframe, the clip will complete 2 full rotations, and settle at a 0.0 degree angle when it reaches the second keyframe. When you specified a value of 2x0.0, the first value (2) is for the number of rotations that you want to make, the second value (0.0) is for the angle that you want to settle at.

go back to Motion Effects: Keyframing the Rotation Property PART 1
continue on to Motion Effects: Keyframing the Rotation Property PART 3

Tuesday, December 9, 2008

Motion Effects: Keyframing the Rotation Property PART 1

Level: Basic
Software: Adobe Premiere Pro
Version: 1.5 (UPDATED FOR CS5 - 2012-07-26)

In this exercise, we will be learning how to use keyframes to animate the rotation property of a video clip.

By the end of this tutorial, you should have something like this:


Let's begin by creating a folder named Keyframe_Rotation. You may place this folder anywhere in your hard drive.

Next, create a new Adobe Premiere Pro CS5 Project. Save this inside the Keyframe_Rotation folder, and give the file the name Keyframe_Rotation as well. For the sequence, select the DV-NTSC Standard 32kHz Preset.

Next, create a new Title by choosing File > New > Title... Name this title rotate_me.

Using the Title designer's Type Tool, type in the words "rotate me" and place it somewhere along the center of your title. Once you've added the text, close the Title Designer window. There is no need to save the title. Premiere will automatically save it for you.


You should now see the rotate_me title in your project window.

From the Project window, drag the rotate_me title down to the video 1 track of your Timeline. You can zoom in on your Timeline in order to see the clip better.


If the clip is less than 20 seconds, extend the clip's duration using the Selection Tool. Position the selection tool over the right edge of the title clip on the video 1 track until it turns into a red bracket icon with a double-headed arrow. Then click-and drag towards the right in order to extend the clip's duration. Increase the duration to about 20 seconds. It doesn't have to be exact. Just make sure it's around 20 seconds.


continue on to Motion Effects: Keyframing the Rotation Property PART 2